6 Exercises to Reverse Bad Posture
October 7, 2014
Did you know that for every inch the head moves forward in posture, its weight on your neck and upper back muscles increases by 10 pounds?
For example, a human head weighing 12 pounds held forward only 3 inches from the shoulders results in 42 pounds of pressure on the neck and upper back muscles. That’s the equivalent of almost three watermelons resting on your neck and back!
When you neglect your posture, you invite chronic back pain. Rounding your low back while sitting for extended periods of time in front of a computer, standing for hours stooped over, sleeping improperly and lifting poorly can all lead to debilitating aches.
Maintaining the natural lumbar curve in your low back is essential to preventing posture-related back pain. This natural curve works as a shock absorber, helping to distribute weight along the length of your spine. Adjusting postural distortions can help stop back pain.
A basic remedy to sitting all day is to simply get up! Frequently getting up from a seated position and doing these six quick and easy realignment exercises can help you reeducate your muscles from getting stuck in a hunched over cave man position.
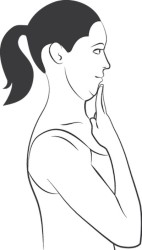
The Chin Tuck can help reverse forward-head posture by strengthening the neck muscles.
This exercise can be done sitting or standing. Start with your shoulders rolled back and down. While looking straight ahead, place two fingers on your chin, slightly tuck your chin and move your head back (image at left). Hold for 3-5 seconds and then release. Repeat 10 times.
Tip: The more of a double chin you create, the better the results. If you’re in a parked car, try doing the Chin Tuck pressing the back of your head into the headrest for 3-5 seconds. Do 15-20 repetitions.
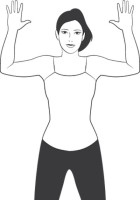
Stand with your back against a flat wall with your feet about four inches from the base. Maintain a slight bend in your knees. Your glutes, spine and head should all be against the wall. Bring your arms up with elbows bent so your upper arms are parallel to the floor and squeeze your shoulder blades together, forming a letter “W” (image at left). Hold for 3 seconds.
Next, straighten your elbows to raise your arms up to form the letter “Y.” Make sure not to shrug your shoulders to your ears. Repeat this 10 times, starting at “W,” holding for 3 seconds and then raising your arms into a “Y.” Do 2-3 sets.
This exercise loosens those tight chest muscles!
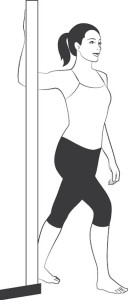
Standing in a doorway, lift your arm so it’s parallel to the floor and bend at the elbow so your fingers point toward the ceiling. Place your hand on the doorjamb.
Slowly lean into your raised arm and push against the doorjamb for 7-10 seconds. Relax the pressure and then press your arm against the doorjamb again, this time coming into a slight lunge with your legs so your chest moves forward past the doorjamb for 7-10 seconds (image at left). Repeat this stretch two to three times on each side.
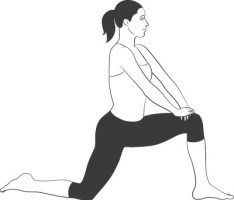
Kneel onto your right knee with toes down, and place your left foot flat on the floor in front of you.
Place both hands on your left thigh and press your hips forward until you feel a good stretch in the hip flexors.
Contract your abdominal muscles and slightly tilt your pelvis back while keeping your chin parallel to the floor (image at left). Hold this pose for 20-30 seconds, and then switch sides.
The next two exercises require a resistance band:
This exercise helps strengthen your upper back muscles, especially the ones between your shoulder blades (the rhomboids).
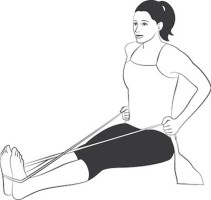
Sit on the floor with your legs extended forward. Place the middle of the resistance band around the bottom of your feet and cross one side over the other to form an “X”.
Grasp the ends of the band with your arms extended in front of you.
Pull the ends of the band toward your hips, bending your elbows so they point backward (image at left). Hold and slowly return. Do 8-12 repetitions for three sets.
According to a 2013 study by the Scandinavian Society of Clinical Physiology and Nuclear Medicine, performing this simple resistance band exercise 2 minutes a day, five times a week, will significantly decrease your neck and shoulder pain and improve your posture.
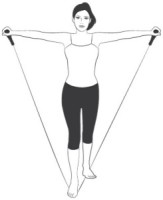
While standing, stagger your feet so one is slightly behind the other. Grasp the handles, or the ends, of the resistance band and lift your arms upward and slightly outward away from your body about 30 degrees.
Keep a slight bend in your elbows. Stop at shoulder level; hold and return.
Make sure to keep your shoulder blades down and back straight. Repeat this exercise for 2 minutes each day, five days a week.
Good work!

